Signin
FAQ
Web Document
Quick Setup Guide – TMDsuite Retail Billing Software.
Step 0: Buy a Plan & Register
Go to: https://www.tmdsuite.com/pricing
➤ Choose the right plan (Beginner, Small Business, Medium, or Large)
➤ Click Buy Now
Register here: https://www.tmdsuite.com/register
➤ Fill in your store name, email, and mobile number
➤ On successful registration, your unique store URL will be created
Step 1: Log in to Your Store
Open your store dashboard using the URL shown after registration success
Example: https://yourstore.tmdsuite.com/frontdesk/
Enter your Admin Username and Password
Click Login
Step 2: Set Up Store Profile
Go to the Left bar: Settings → Profile Settings
Configure:
Store Name, Owner, Address, Email, Phone
GST No. GST Type, Currency, Language, Timezone
Store Bank Account, Invoice Prefix, and Region
Add Store Logo, Signature, and Icon
Step 3: Add Categories & Products
Create product categories: Catalog → Category
Add individual products: Catalog → Product
Or bulk import with .CSV/.XLS: Product → Bulk Import
Step 4: Add Customer Groups & Customers
Create customer groups (Retail, Wholesale, etc.):
Crm → Customer Group
Add customers manually with name, mobile, and address
Step 5: Set Up Bank Accounts
Accounts → Bank Accounts
Add your bank account(s) to manage store payments and cash tracking
Step 6: Configure POS Settings
Navigate to: Settings → Pos Settings to customize:
Customer Form and Default Group
Invoice Layout and PayNow Button
Return Reasons, Payment Methods
Shipping Charges, Display Options
Non-Catalog Product Handling
Step 7: Configure Tax & GST
Go to: Settings → Profile Settings
Choose GST Type (Include, Exclude)
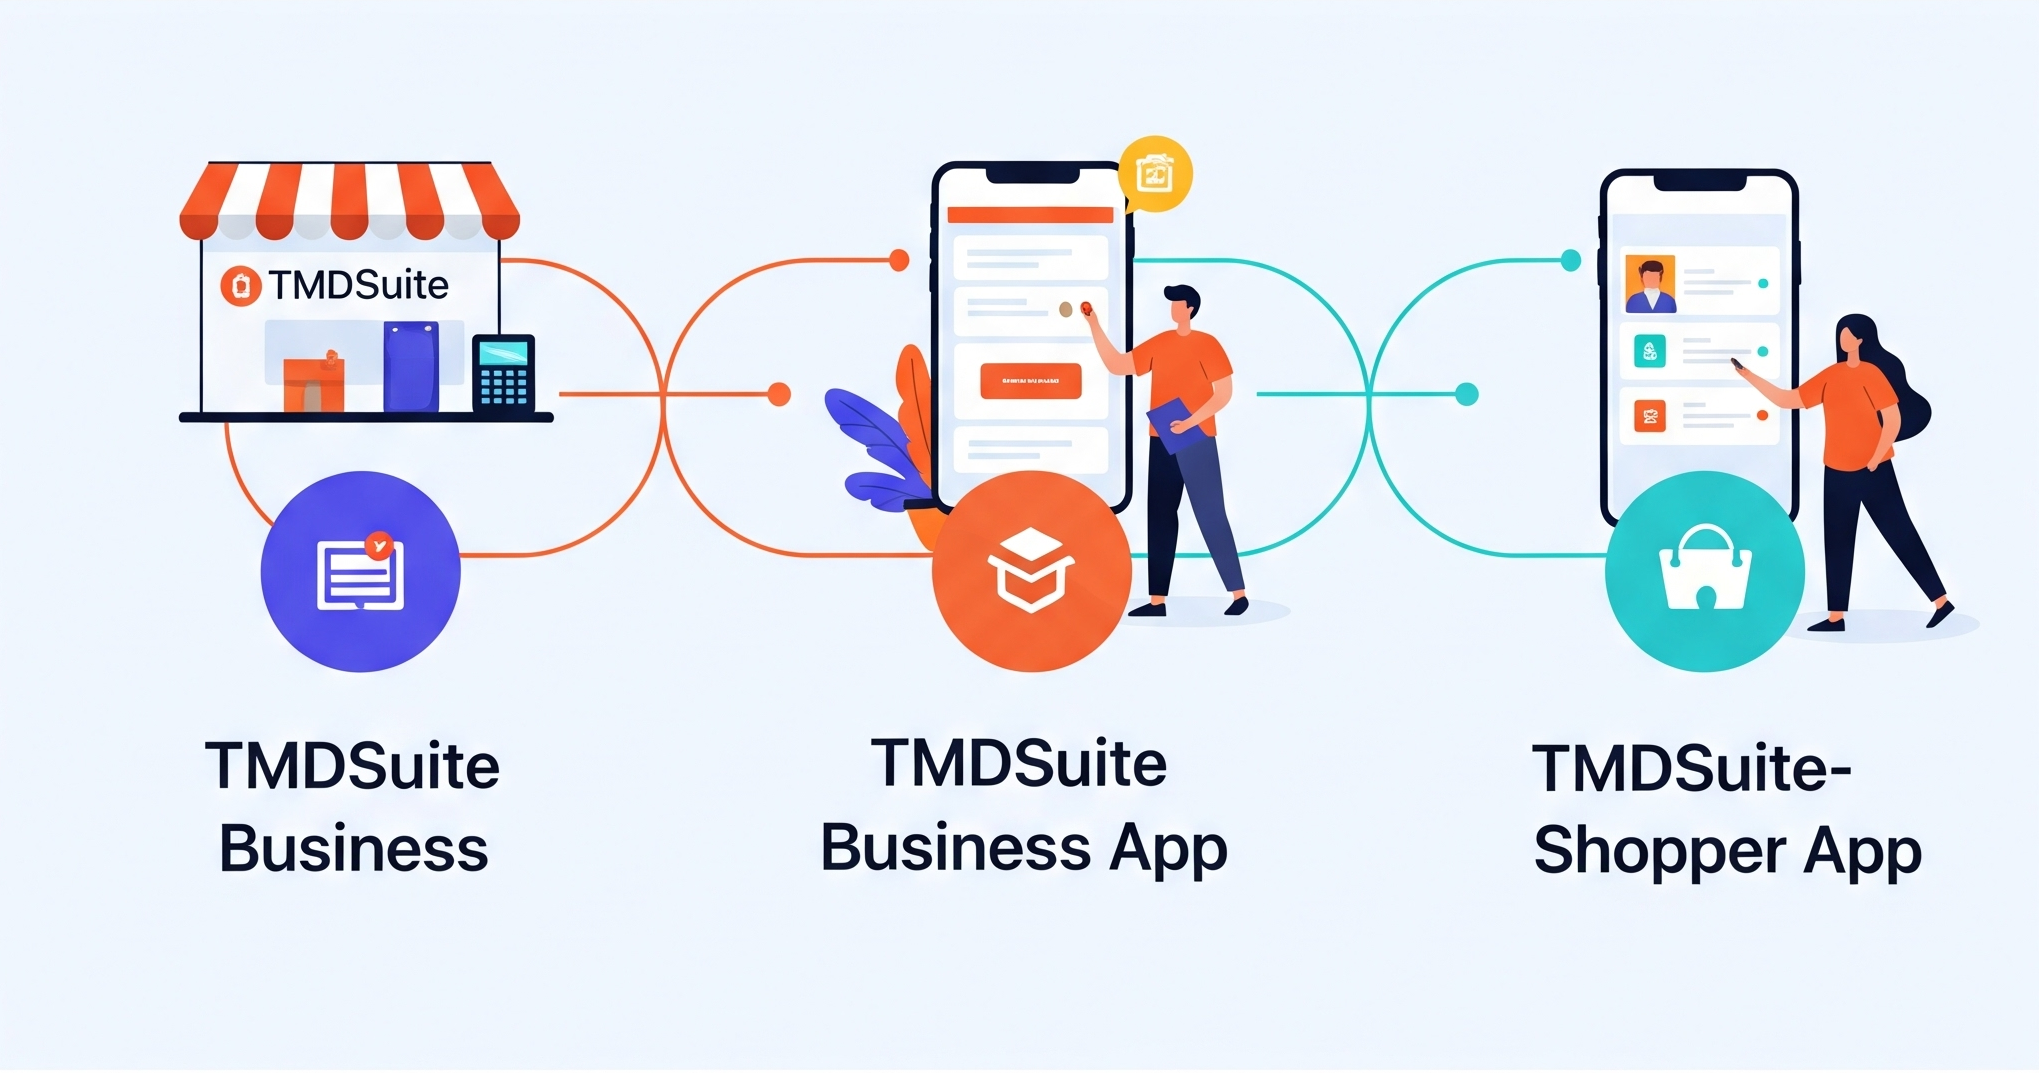
Step 8: Install TMDsuite Mobile Apps
TMDsuite Business App (for store owners):
Use this app to:
Manage billing, stock, orders, returns, and reports
View sales in real-time
Create and process orders
TMDsuite Shopper App (for your customers)
Let your customers:
Scan your store QR code
View your product catalog directly in the app
Place orders remotely from anywhere
This helps your store go digital and accept remote orders easily — great for home delivery, pre-ordering, or customer convenience.
Download From Playstore
You can find and print your store QR codes under:
Settings → Tmdshopper Setting
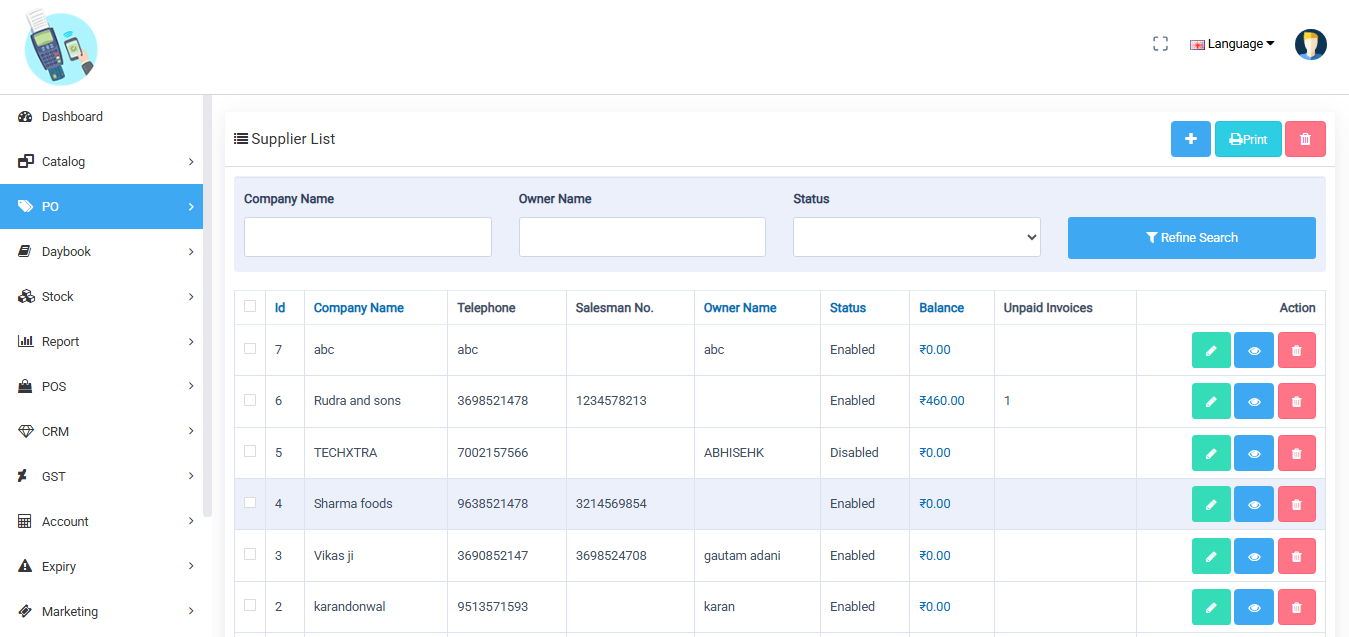
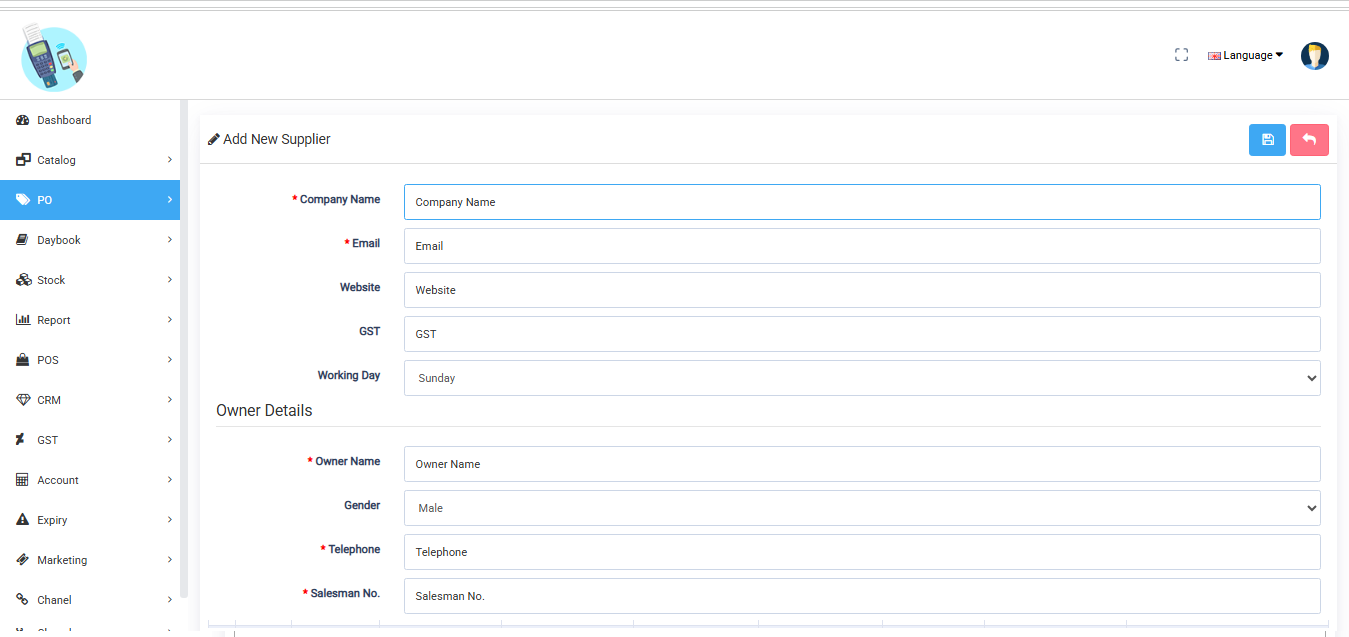
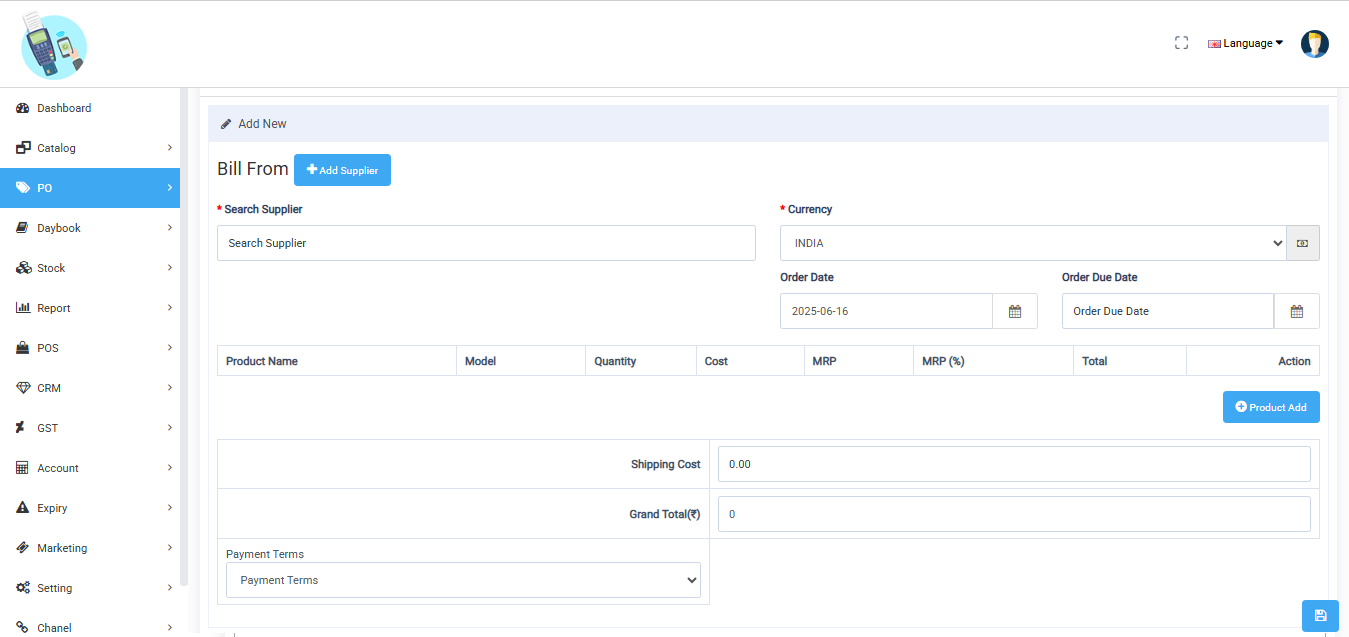
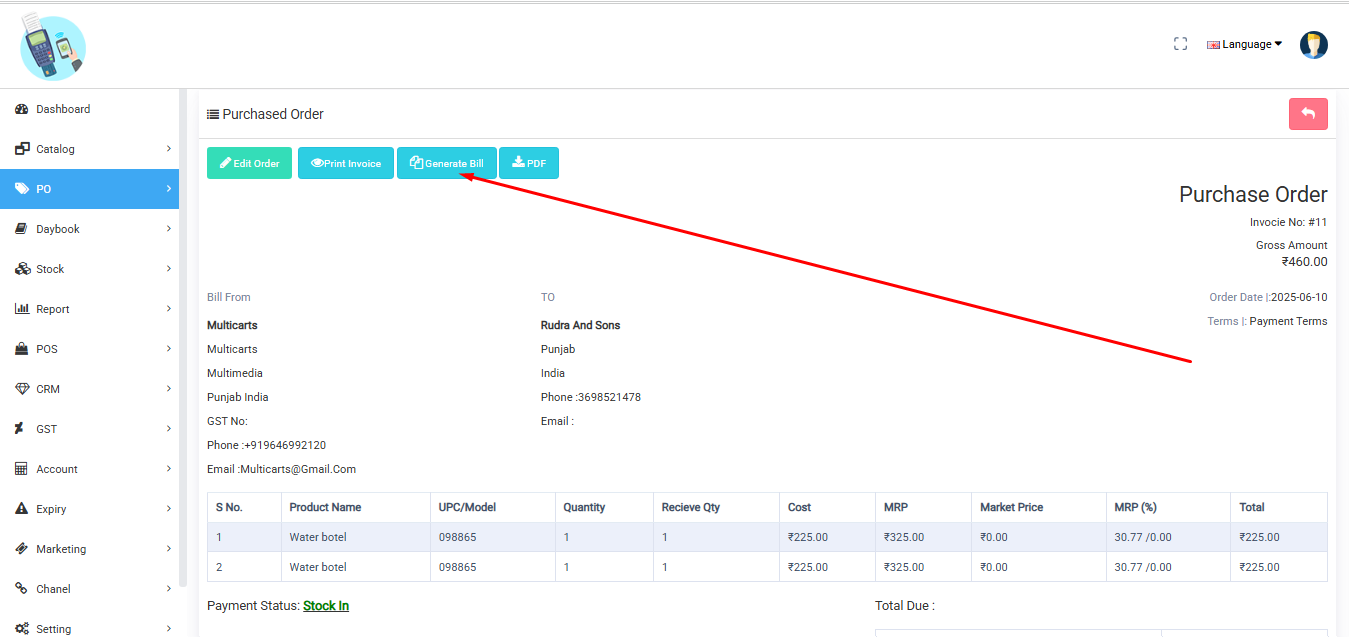
Step 9: Set Up Purchase Order
Add suppliers: PO → Suppliers
Create Purchase Orders and Supplier Bills
Track stock received, payments, and dues
Step 10: Start Billing and Selling
Go to: POS → Open POS
Add or scan a product
Select customer
Apply discounts or rewards
Print invoice and collect payment (Cash/UPI/Card)
The Dashboard shown in the icon image is the main control panel for the TMD Suite software. It provides a clean and intuitive interface for shop owners or retail businesses to manage daily operations. This Dashboard acts as the central hub for running your retail business operations efficiently — from managing stock and sales to generating barcodes, viewing reports, and adjusting system settings.
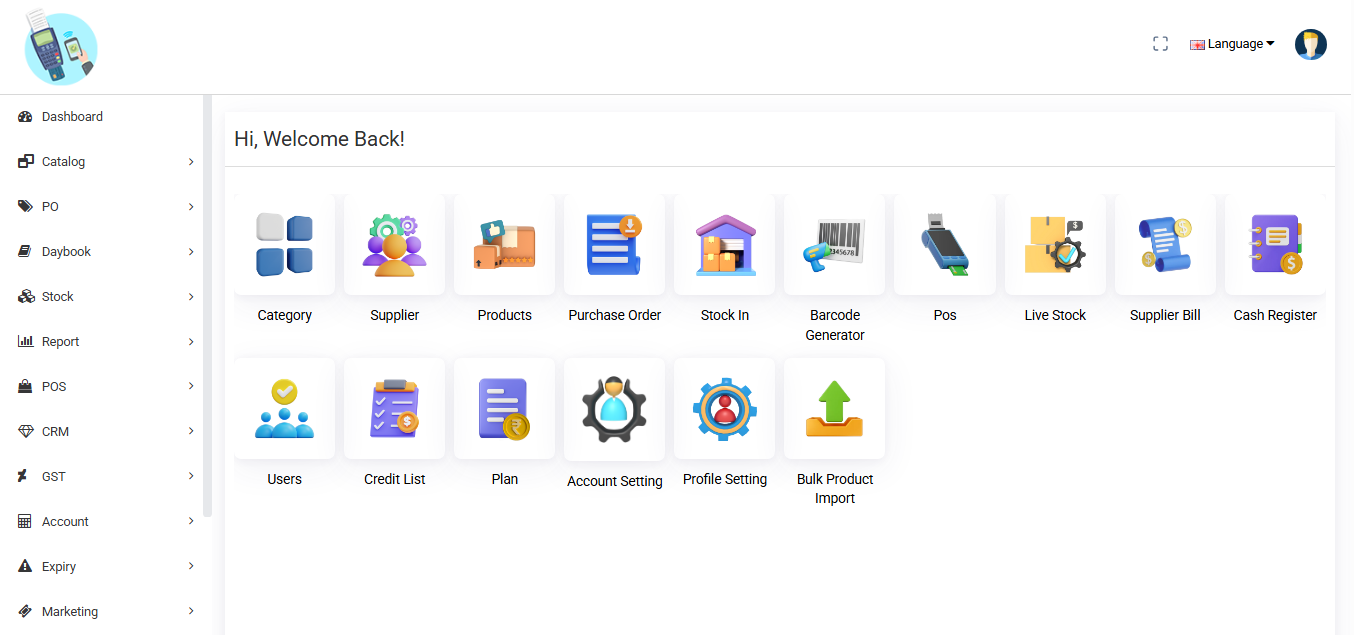
Category - Manage product categories
Supplier - Add and manage supplier information
Products - Add, update, or delete products
Purchase Order - Create and manage POs from suppliers
Stock In - Add received stock into inventory
Barcode Generator - Create barcodes for products
POS - Open point-of-sale terminal
Live Stock - Real-time inventory overview
Supplier Bill - Track and manage bills from suppliers
Cash Register - Manage daily cash flow
Users - Add or control user access
Credit List - View customers with pending credit
Plan - Manage the current pricing plan
Account Setting - Configure account-specific settings
Profile Setting - Change user profile settings
Bulk Product Import - Import multiple products using a file
To manage payments and transactions, you need to link each supplier with an account.
Fields Explained:
1. Supplier Account
Detail: Select the supplier from the list. This connects the account details to a specific supplier.
2. Account No
Detail: Enter the account number used for transactions with this supplier. This could be a bank account number or internal reference.
3. Save

To sell a product through POS, you must first add the product.
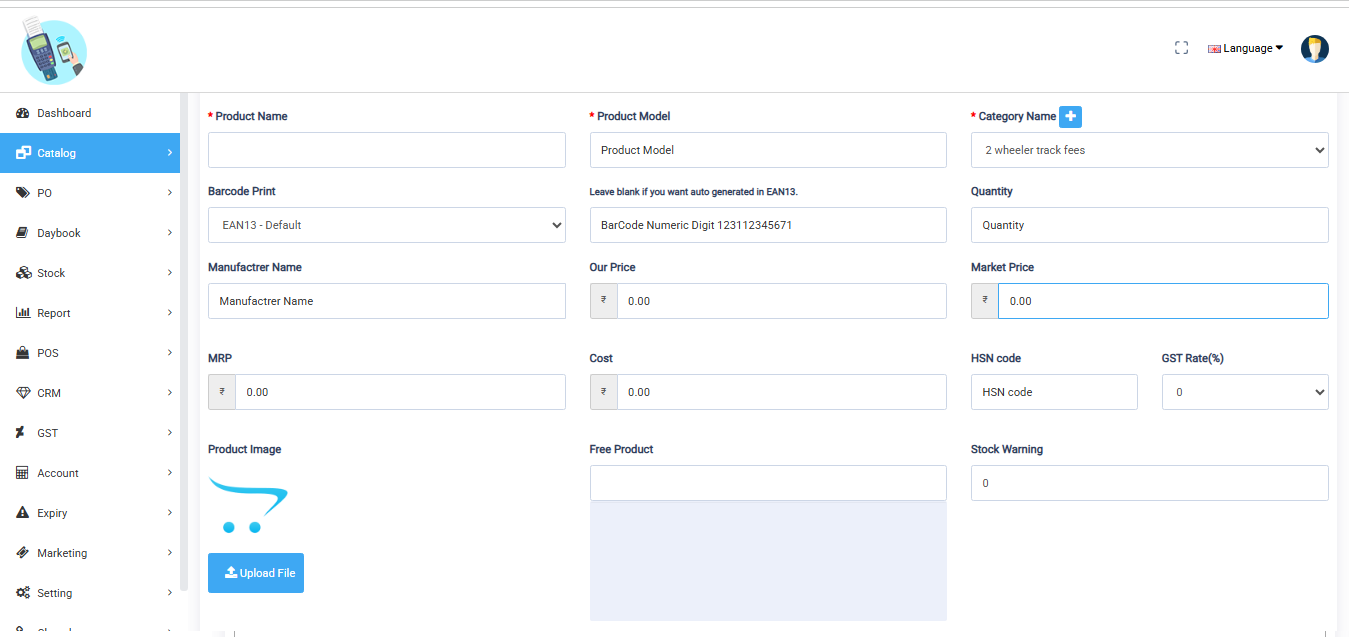
Steps to Add a New Product
1. Product Name
Detail: Enter a descriptive and accurate product name.
2. Model
Detail: Enter the unique model number or identifier for the product. This helps in tracking and managing inventory accurately.
3. Select Category
Detail: Choose the appropriate category to assign the product. This helps organize products in your store.
4. Barcode Type
Detail: Select the barcode type to use for printing, such as Code128 or EAN13. This defines the format of the printed barcode.
5. Product Quantity
Detail: Enter the available stock quantity for the product. This helps manage inventory and control stock levels in your store.
6. Manufacturer Name
Detail: Select or enter the manufacturer or brand name of the product. This helps customers identify the product’s origin or brand.
7. Our Price
Detail: Enter the selling price of the product that will be displayed to customers in your store.
8. Market Price
Detail: Enter the original or regular market price of the product. This is used to show discounts or savings compared to your selling price
9. MRP (Maximum Retail Price)
Detail: Enter the maximum price at which the product can be sold to customers. This is usually printed on the product packaging.
9. Cost
Detail: Enter the purchase or production cost of the product. This is used for profit margin and internal accounting purposes.
10. HSN Code
Detail: Enter the HSN (Harmonized System of Nomenclature) code for the product. It is used for tax classification under GST.
11. GST Rate (%)
Detail: Select the applicable GST rate for the product. This rate will be used to calculate tax during billing.
12. Product Image
Detail: Upload a clear image of the product. Use JPG or PNG format to visually represent the item in your store.
13. Select Free Product
Detail: Choose a product to offer for free with this item, if part of a promotional deal or combo offer.
14. Stock Warning
Detail: Set a minimum stock level to trigger a low stock alert. This helps you restock products on time.
15. Save Button
Detail: Click the Save button to store the product details in your system. Usually located at the top right corner.
A category organizes products into groups, making it easier for customers to navigate, search, and find items. It also helps in managing and displaying products systematically in the store.
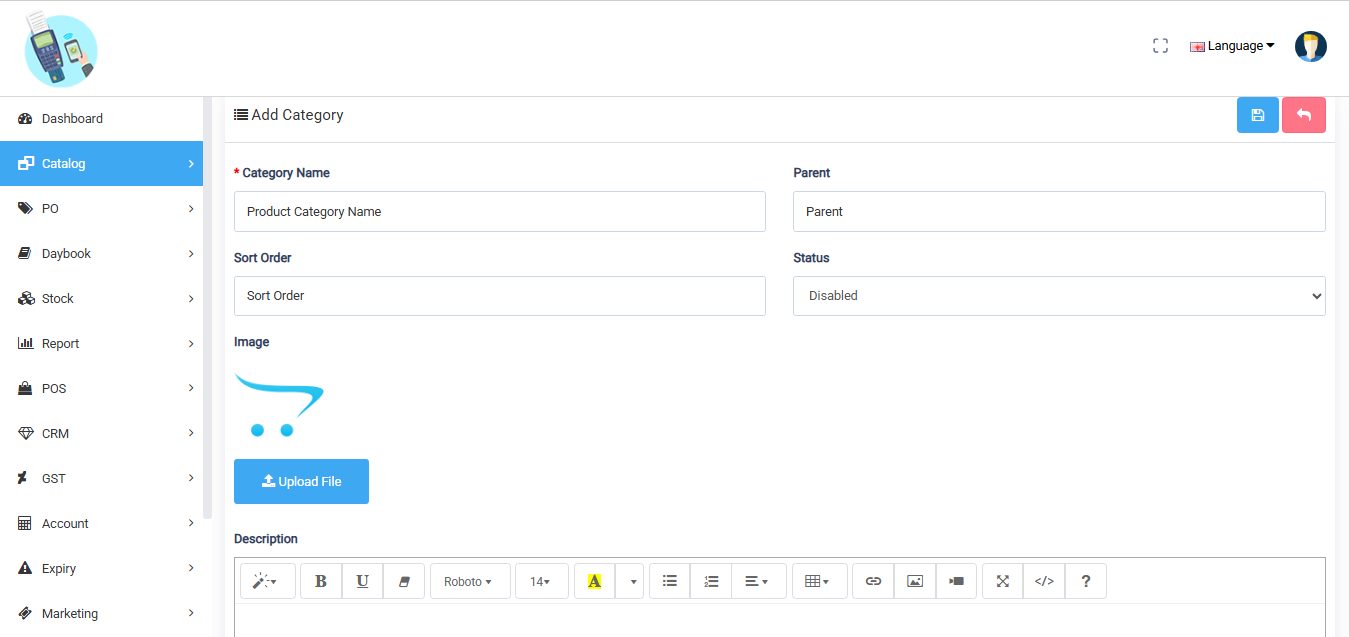
Steps to Add a Product Category in TMDSuite
1. Category Name
Detail: Add Category Name. This may appear in the store.
2. Parent
Detail: Select a parent category to make this a subcategory.
3. Sort Order
Detail: Add sort order to organize the position of the category.
4. Status
Detail: Choose the status to show or hide this category on your store.
5. Upload an Image
Detail: Upload a representative image for the category to enhance its appearance in the store.
Please use JPG or PNG format.
6. Description
Detail: Add a description to provide more information about the category.
7. Save Button
Detail: Use the Save button at the top right corner to save the category to your store.
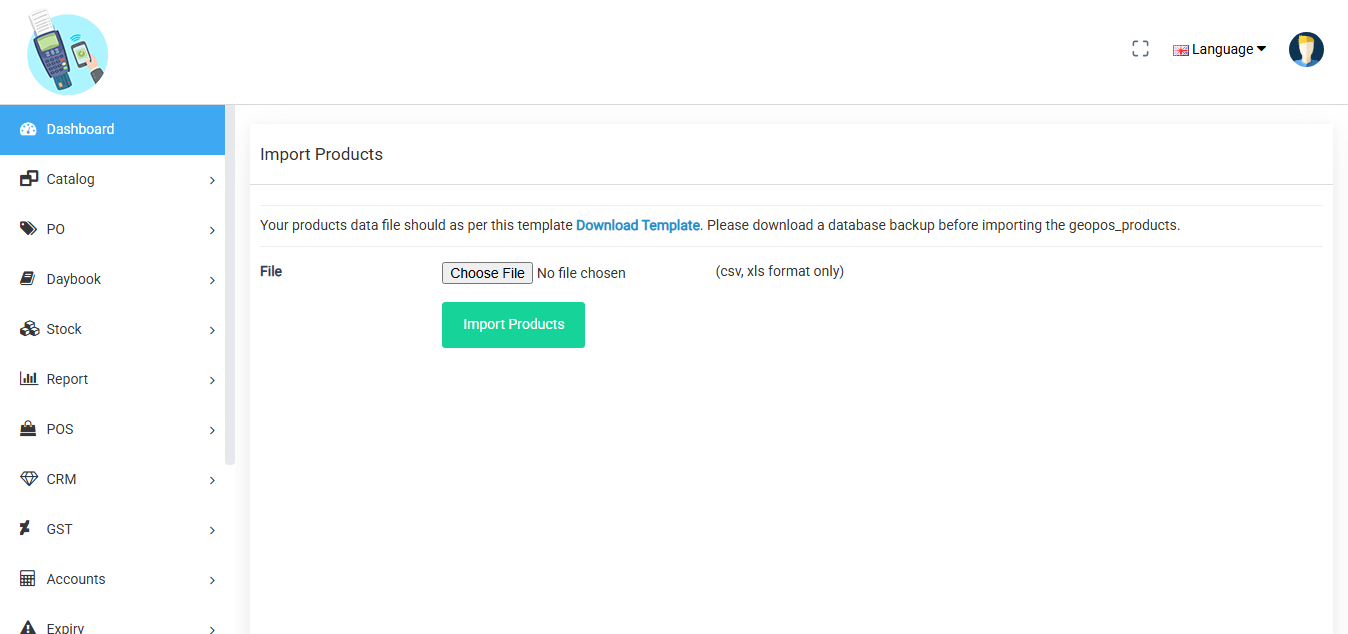
The Bulk Product Import feature allows store owners to upload multiple products at once into the system using CSV or XLS files. This saves time, reduces manual entry, and helps maintain a consistent product database.
Supported File Types
.CSV (Comma-Separated Values)
.XLS (Excel Spreadsheet)
Bulk Product Import
Steps to Import Products
1. Go to
Dashboard → Bulk Product Import
2. Download Sample File
Click on the “Download Sample CSV/XLS” button.
This sample contains the required columns and format.
3. Fill in Product Data
Open the downloaded file and fill product info:
Product Name
Model
SKU
Category
Purchase Order Price
MRP
Retailer Price
Quantity
After full details of all products
Upload File
Click “Choose File” and upload your filled CSV or XLS file.
Import Products
Click “Import.”
The system validates the data and inserts products into your catalog.
To create a coupon, visit in TMDSUite panel.
Go to Marketing > Coupon
Click Add New Coupon
Set: Coupon Code (e.g., SAVE20)
Discount Type (Flat or Percentage)
Usage Limit Valid From / To
Customers and salespeople can apply it during billing in the POS or online store cart page.
This feature allows you to create and manage discount codes that can be applied during billing.
A product barcode is a unique visual representation of data, typically in the form of vertical lines or patterns, that encodes information about a product. It is used to identify items quickly and accurately in inventory, sales, or logistics processes.
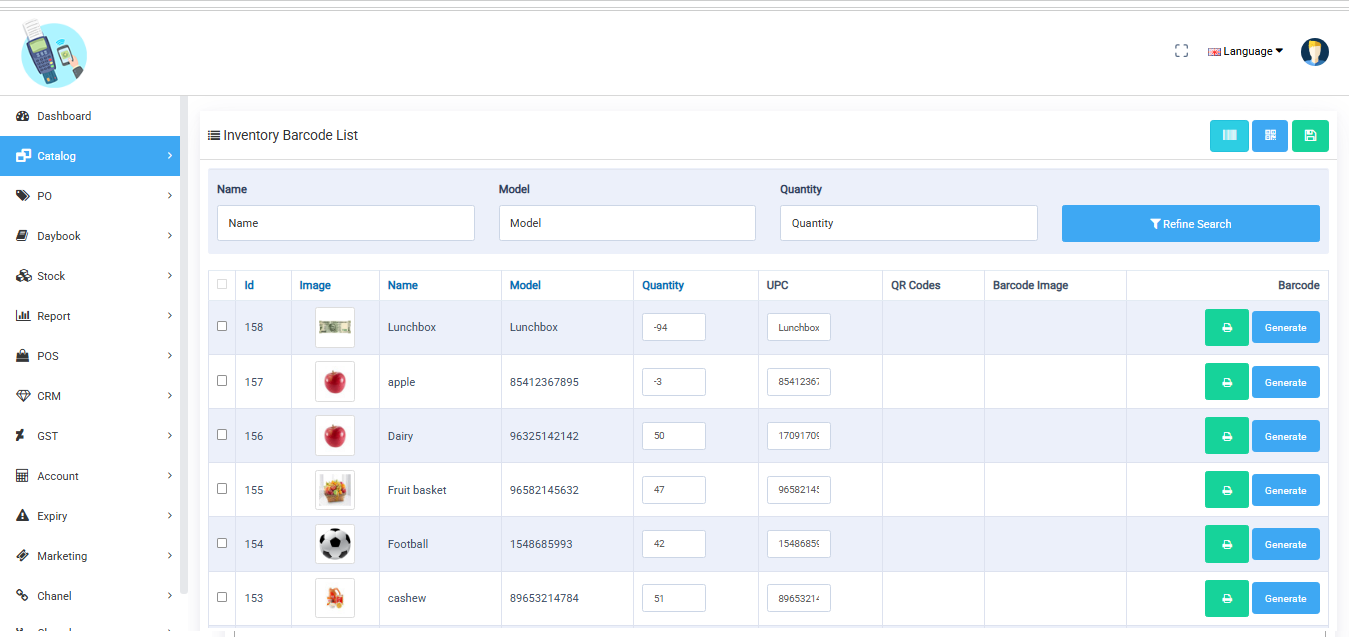
Steps to generate a product barcode
Go to Barcode Generator
In the left menu, click Catalog → Barcode Generator.
Search Product
Use the search bar to find the product by UPC or name.
Generate & Print
Click the green printer icon next to the product.
This will create a barcode label.
Use your connected printer to print it.
Expiry Management in TMDsuite helps retail store owners track and manage products with expiry dates, especially useful for groceries, medicines, cosmetics, and perishable items.
Purpose of Expiry Management
To avoid selling expired items
To clear near-expiry stock on time
To maintain customer safety and trust
To ensure legal compliance in industries like food and pharma
Features in Expiry Management
1. Expiry Report
Shows a list of products with expiry dates.
Highlight which products are nearing expiry or have already expired.
Can be filtered by product, brand, category, or date range.
Use it to monitor expiry-sensitive stock.
2. Expiry Stock Out
Let you remove expired products from the inventory.
Helps update stock levels by marking expired items as unusable.
Can also track losses due to expired stock.
Helps clean expired inventory and keep records.
3. Expiry Status
Gives a summary view of expiry stock:
Total expiring this month
Already expired
Safe stock
Color-coded or sectioned by urgency.
Helps prioritize the clearance or promotion of soon-to-expire products.
4. Exchange Report
Records all items that were exchanged due to expiry.
Shows which expired items were returned by customers or replaced internally.
Maintains accountability with quantity, date, and reason.
Useful for tracking customer returns or supplier replacements.
A non-catalog product on a POS (Point of Sale) system refers to an item that is not pre-registered in the product database. Instead, it is manually added during a transaction when the item is not available in the system's catalog or inventory.
How to Add a Non-Catalog Product in POS:
Click on "Non-Catalog Product" (or a similar option like "Miscellaneous Item").
Enter Product Details:
Name: (E.g., "Custom Engraving Service")
Model/SKU: (Optional, if applicable)
Price: (Enter the selling price)
Quantity: (Number of units sold)
Click "Add Product" (or "Confirm") to include it in the cart.
Complete the Sale – The item will be processed like any other product in the transaction.
The Day Book form in this web application records daily financial transactions. It tracks cash inflows and outflows, offering a consolidated view of daily business activity. This tool helps manage accounts, reconcile cash, and maintain accurate financial records for better operational control and analysis.
Fields Explained:
Check the selected date before adding the daybook detail.
1. Opening Balance
Detail: Enter the cash amount available at the beginning of the day.
2. Card
Detail: Enter the total amount received through card payments.
3. UPI
Detail: Enter the amount received via Paytm or any UPI/digital wallet.
4. Manual Entry
Detail: Add any other manual entries, such as expenses or adjustments made during the day.
Manual Account Entry is a feature in TMDSuite that allows the shopkeeper or admin to manually record financial transactions that may not be directly linked to sales, purchases, or automated operations in the system.
Purpose of Manual Account Entry:
To add or adjust balances for internal transactions
How It Works:
Go to Account → Manual Account Entry
Select Account Type (e.g., Expense, Income, Bank)
Enter:
Amount
Transaction Date
Description or Note
Click Submit
The amount gets reflected in the account reports or ledgers.
The Marketing Panel in TMDsuite helps shop owners engage with customers, boost sales, and run promotions using two powerful tools:
1. Campaign (WhatsApp Marketing)
This feature allows you to send promotional messages directly to customers on WhatsApp.
Send offers, discounts, and product updates
Notify about new stock or sale events
Target specific customer groups (e.g., frequent buyers)
How It Works:
Go to Marketing > Campaign
Select customers or upload numbers
Write your message
Attach images or links if needed
Send via WhatsApp API integration or bulk sender
2. Coupon (Discount on Sale)
This feature allows you to create and manage discount codes that can be applied during billing.
Create flat or percentage discounts (e.g., ₹50 OFF or 10% OFF)
Set conditions: minimum cart amount, valid dates, usage limits
Promote through WhatsApp Campaigns or in-store banners
How It Works:
Go to Marketing > Coupon
Click Add New Coupon
Set: Coupon Code (e.g., SAVE20)
Discount Type (Flat or Percentage)
Usage Limit Valid From / To
Customers can apply it during billing in the POS or online
Here’s a detailed explanation of each field in the Shop Profile Setting section in TMDSuite — these settings define the core identity, compliance, and behavior of your store in the system.
Profile Setting – Field
Store Name
The official name of your shop (e.g., "TMD Electronics"). This appears on invoices and front-end.
Store Title
A short tag line or title for branding. Often shown in browser tabs or headers.
Store Owner
The person or company legally owning the store. Useful for admin records and documentation.
Address
The complete business location address – used in invoices, shipping, and contact purposes.
Primary contact email of the store – for customer inquiries, order notifications, etc.
Telephone
The store's contact number is shown on invoices or customer queries.
Fassi Code
A store-specific business or internal code (optional), often used for barcode or inventory tracking.
GST No.
Your registered Goods & Services Tax number (India-specific) used in tax calculation and invoicing.
GST Type
Type of GST applied to the product price. include, Exclude.
Country
The country where the store operates impacts currency, tax, and legal configuration.
Region / State
The specific region or state of your store (used for region-based taxes and shipping rules).
Language
The default language used across the POS or web store interface.
Currency
Base currency for product prices, transactions, and financial reports.
Time Zone
Sets the system time zone for orders, billing timestamps, and reports.
Store Bank Account
Select the Bank account for the customer's payments and refunds.
Invoice Prefix
Short prefix added before invoice numbers (e.g., INV2025-) to help with invoice series management.
Complete Order Status
Short prefix added before invoice numbers (e.g., INV2025-) to help with invoice series management.
Autogenerated PO Quantity
Autogenerated PO Quantity is a smart feature in TMDsuite that automatically suggests or fills product quantities in a Purchase Order (PO).
PO Processed Status
Status to be set once a Purchase Order (PO) is confirmed and processed.
PO Due Status
Status to identify stock-in, processed, and partially received.
Default Items Per Page
Sets how many records/products are shown per page in listings – improves pagination.
Store Logo
Upload your store’s logo – displayed on invoice, login screens, dashboard, etc.
Signature Image (for invoice)
Upload a scanned or digital signature – automatically printed on invoices.
Status
Enable or disable the store – disabled means POS/webstore functions are inactive.
TMDSuite Web Application, explaining its purpose and usefulness for business reports.
1. Sale Report
Purpose: Provides a detailed record of all sales transactions within a selected period.
Use Case: Track revenue, analyze sales trends, and reconcile daily/monthly sales.
2. Day Summary
Purpose: A consolidated overview of the day’s business activities, including total sales, returns, and payments.
Use Case: Quick daily performance check for managers.
3. Product Sales
Purpose: Lists all products sold with quantities, prices, and revenue contribution.
Use Case: Identify top-performing products and inventory demand.
4. Credit Report
Purpose: Tracks all credit-based sales (unpaid invoices or customer dues).
Use Case: Monitor outstanding payments and follow up with customers.
5. Payment Report
Purpose: Summarizes payment methods used (cash, card, UPI, etc.) and amounts collected.
Use Case: Reconciliation with bank deposits and payment mode analysis.
6. Best Selling
Purpose: Highlights the most frequently sold or highest-revenue products.
Use Case: Optimize inventory stocking and promotions.
7. Cash Register
Purpose: Logs cash inflows/outflows (sales, expenses, drawer adjustments).
Use Case: Ensure cash accountability and detect discrepancies.
8. Return Report
Purpose: Records returned items with reasons, quantities, and refund amounts.
Use Case: Analyze return reasons (e.g., defects, customer dissatisfaction).
9. Day Book
Purpose: A comprehensive ledger of all daily transactions (sales, purchases, expenses).
Use Case: Financial auditing and bookkeeping.
10. Stock Report
Purpose: Shows current inventory levels, stock movements, and low-stock alerts.
Use Case: Prevent stockouts and manage reordering.
11. Product Summary
Purpose: Aggregates product-wise sales data (total sold, revenue, discounts).
Use Case: Compare product performance and adjust pricing strategies.
12. B2B Report
Purpose: Details transactions with other businesses (GST-compliant invoices).
Use Case: GST filing and B2B customer analysis.
13. B2CS Report
Purpose: Summarizes Business-to-Consumer (B2C) sales, typically for small transactions.
Use Case: Compliance with GST rules for retail sales.
14. HSN Report
Purpose: Categorizes products by HSN (Harmonized System Nomenclature) codes for tax filing.
Use Case: Mandatory for GST returns in India.